Easter Perler Bead Patterns for Kids
Welcome the spring season and holiday with an Easter Perler Bead project!

Celebrating Easter with children is so much fun. From dying colorful eggs to making soft cotton ball bunnies, there are so many adorable activities to do in honor of this sweet spring holiday. Today, we’re going to introduce you to a few Easter Perler bead patterns that every bunny is sure to love.
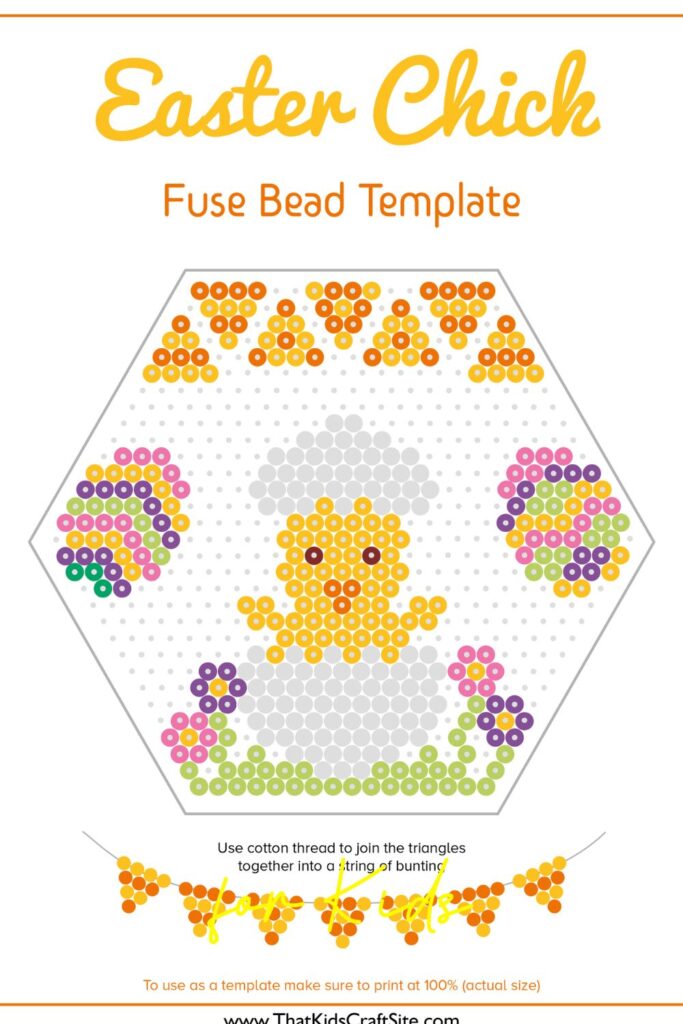
Hop into holiday fun by making Easter theme fuse bead crafts with your littles. Our adorable Perler bead Easter chick templates will encourage kids to express their creativity and make wonderful crafts with their hands. Children will absolutely adore the heartwarming patterns that come with this Easter theme melty bead project template. With colorful Easter eggs, a hatching chick in a meadow of flowers and golden bunting triangles, your little ones will spend hours making fabulous Perler bead creations.
Find the cutest little Easter chick melty bead patterns in our Freebies Library!

Patterns for Easter Melty Bead Crafts
Making Perler bead designs to celebrate the Easter holiday is so much fun and really easy to do. You will only need a few materials to complete the most adorable Easter fuse bead projects.
Below is a list of the supplies that you will need to make Easter chick fuse bead projects.
Materials:
- Perler Beads
- Iron
- Ironing Board
- Parchment Paper
- Free Easter Chick Fuse Bead Patterns
- Perler Bead Pen Dispenser (optional)
- Perler Bead Pegboard (optional)
Once you have all the materials, simply follow the steps below to make the cutest little Easter chick bead projects.
Instructions:
- Print out the FREE Easter Chick fuse bead templates on your printer.
- Using a Perler bead pegboard, or just on a flat surface, arrange the Perler beads to look like the design. The Perler bead pen dispenser is a handy tool for placing beads.
- When the beads look like the pattern (or how you want them), cover it carefully with a piece of parchment paper.
- Now heat up the iron to the medium setting. Be careful not to touch the metal plate of the iron. It will be HOT!
- With your project on the ironing board, press down on the Perler beads with the iron for about 10-15 seconds. Moving the iron in a circular motion slowly as you press will help to fuse the beads together.
- Your Perler project is complete! If you prefer, you can choose to fuse both sides of your project. This is totally up to you, but not necessary!
- Your Easter Chick Perler bead project can now be put out on display, turned into a keychain, or even made into a magnet!
The fun thing about Perler bead patterns is that they can match a specific pattern exactly, OR you can use your imagination and simply use the template as a guide. If you want to make a one-of-a-kind piece, try using colors that are different from the suggested pattern. You can even switch up the way the beads lay out, add more, or take some away. Think of Perler patterns as guides for you to do as you wish! In any case, have fun with it!
Some of our favorite Easter Perler bead designs use a variety of different color beads. We like to use jewel tone pegs, beads from the stripes and pearls tray, white, shades of pink, and yellow!

Easter Holiday Fuse Bead Patterns for Children
When you’re feeling ready to hop into some holiday projects, go to our Freebies Library for some really great Easter fuse bead patterns. Our Perler bead designs are sure to make any little bunny swoon! The simple templates and cute designs will have the kids crafting for hours.
Happy Fusing!
You May Also Like…