Ice Cream Perler Beads
Inside the house on a windy day with no place to go? Worry, no more! This colorful and adorable Ice Cream Perler Beads is perfect for a nice and super fun day indoors.

Ice Cream Cone Perler Beads
Here at That Kids’ Craft Site, we are huge fans of anything made with Perler beads (you can probably already tell by how many Perler beads crafts we have on here!) and you know what else we’re really big fans of? Ice Cream!
We decided to mix our favorite things in one perfect craft and this ice cream cone made of Perler beads is the result. Not too shabby, if I do say so myself! 😉
Honestly, this is not just a beautiful craft to make with your kids but it’s also a lifesaver on cold and windy days. It’s a fantastic option when you need indoor activity and you’re running out of ideas.

As a mom of easily-excited and very active children, this sort of craft project is a godsend. It keeps them entertained, focused, encourages their creativity and their reward is not just feeling proud of what they’ve created but they also get to play and display their little ice cream cones after the craft session is over.
Another big plus? It doesn’t leave a mess behind, which is something we can all agree is probably the best thing ever for us moms!
This adorable Ice cream Perler Beads craft is going to capture the imagination of both preschoolers and older kids and that’s a win-win situation in my mom-book!
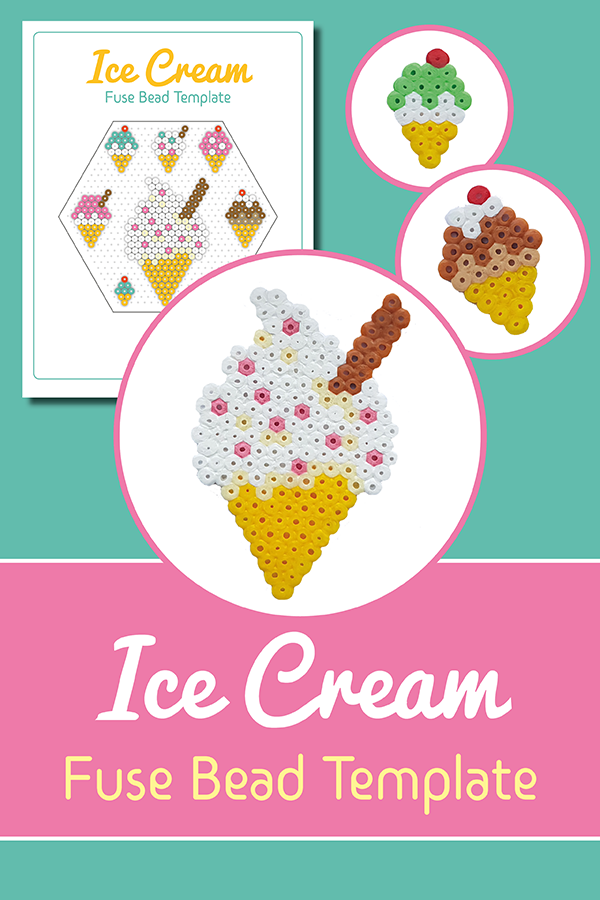
You can use the same colors as we did. A bright yellow, a lovely pink, sprinkle some light pale yellow beads and of course, white beads to recreate the yummy vanilla ice cream flavor and as a final touch a brown color for the wafer stick. (Okay, now I really want some dessert!)
But feel free to let your imagination and creativity run free and pick the colors you like best. There’s a huge variety of Perler beads colors, you’ll have a hard time picking just a few!
How to Make a Perler Bead Ice Cream Pattern
Get the Ice Cream Perler Bead Pattern -> HERE
Create the ice cream cones with these materials (affiliate links below):
- Printable Ice Cream Perler Bead Pattern – Get It HERE!
- White Perler Beads
- Pale Yellow Perler Beads
- Light Pink Perler Beads
- Yellow Perler Beads
- Brown Perler Beads
- Square Bead Tray
- Tweezers
- Ironing Paper
- Iron
Get the Ice Cream Perler Bead Pattern -> HERE
How to Assemble Your Ice Cream Perler Bead Pattern
There’s nothing too complicated in this lovely design! To get the edges of the ice cream on the board, you need to make sure to leave plenty of space on each side. By keeping this in mind, you won’t throw off the design and you’ll avoid having to start over.
You can start in any direction you want because the pattern is easy to follow but we decided to start at the bottom and work our way up, just to keep everything more visually organized. It’s really helpful to guide yourself with the edges of the pegboard and focus on one row at a time up until the cone starts to take shape!
Now, the fun just gets better! Don’t be afraid to mix up colors! Instead of vanilla ice cream, you could use brown for chocolate or pink for strawberry. The options to be creative are endless!
Super easy, right? I know, that’s why I absolutely love Perler Beads Crafts. But the fun doesn’t end here! You can hang up your brand new ice cream cones on your walls, make them into cute little magnets for the freezer or as a small decoration for birthday parties.
Have fun and enjoy your new Ice cream made with Perler Beads!
You Might Also Like These Crafts for Kids: